HelioScope Review
- The HelioScope solar software was developed two years ago by the Folsom Lab. The main idea of the product is to simplify the process of designing renewable energy facilities and improving their engineering properties. The Folsom Labs team presented the latest updates of their solar software in 2020, having added new streamlined layout tools and an electrical section for more comprehensive designing reports.

Let’s take a closer look at the HelioScope solar software that helps solar installers to improve their design speeds by 8-10 times and reduce installation costs significantly.
Project Creation

It is worth noting that HelioScope is available for free if the user passes the registration procedure. Having created an account, it is possible to try a demo version of the software (the trial period expires only in a year of the HelioScope software use). The HelioScope team sends the verification letter together with a guide for beginners to simplify the process of acquaintance with the solar software for commercial and residential design.
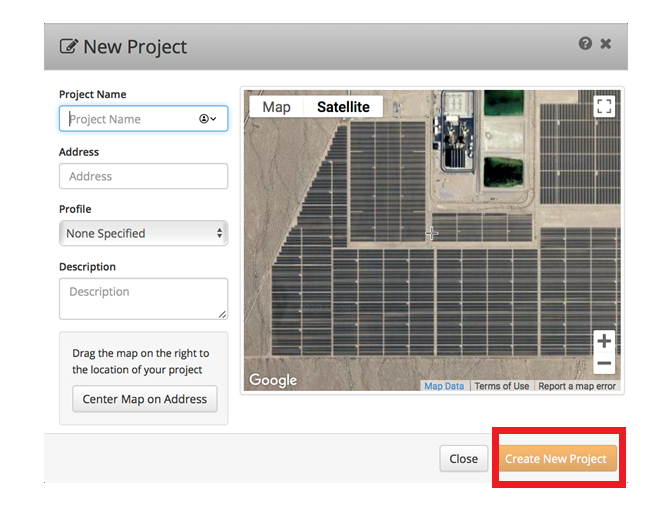
To create a new project, the user needs to specify the project name. It is possible to sync the Google map or satellite details with the project address. Optionally, the project address can be specified manually. The profile type should be selected from the list of available ones (commercial or residential premises). When the required information is provided by the user, it is necessary to click Create New Project button to complete the first step.
HelioScope Designing Options
The HelioScope in-depth designing solutions include 3D design, mechanical, and electrical schemes. The user should start with the 3D design to specify all necessary physical dimensions, setback settings, and other specifications. There is a user-friendly menu of options to take into account for each of the three available designing sections (3D design, mechanical, and electrical sections).
Solar Module 3D Design
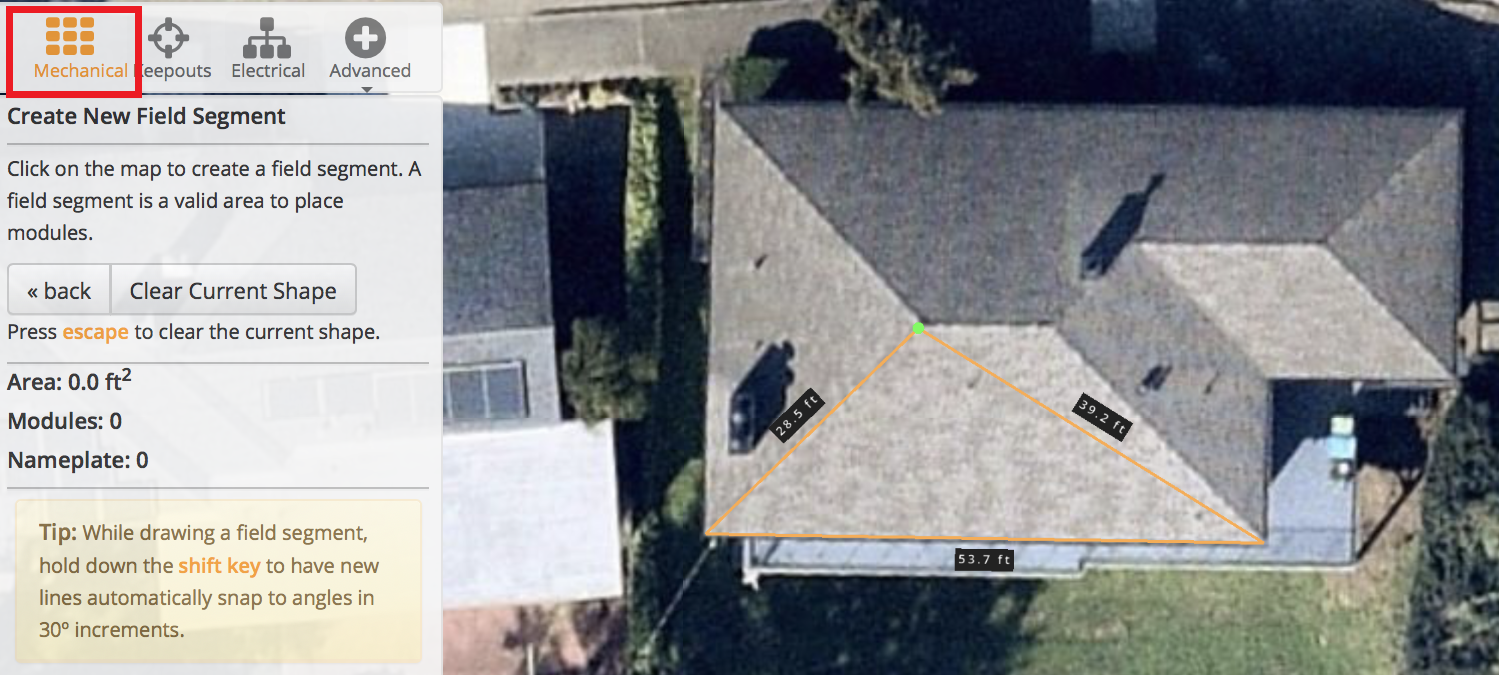
Let’s review the first designing option at the example of the commercial object. First, it is necessary to trace the rooftop and choose modules. The user clicks on the map to add new field segments. These segments are valid areas to place PV solar modules on the surface. Double click is suitable to save the area. The automated calculations of the area take place right after the area for the PV panel is determined. The calculation is presented in square feet.

The list of available module types is performed in the menu. Both modules and nameplates can be chosen. Then, other specifications should be selected. Among them are azimuth, racking type, module height, row spacing. To overview the 3D design of the project, the user needs to turn the object to the sides and zoom any element if necessary. Each action is done with the mouse buttons.
To reduce installation costs and get accurate calculations, it is necessary to:
- Set building setback distances;
- Select keep-out shapes and trace keep-outs;
- Specify the height, limits of keep-outs and other objects free from modules (paths, straight lines, etc.);
- Edit shaded modules (remove, restore, and optimize them).
When the main settings are completed, it is possible to choose the type of inverter for the rooftop solar installation and specify necessary adjustments (conductors) to finish the 3D HelioScope design.
Mechanical Layout & Electrical Design
The 3D design includes both mechanical and electrical schemes. The mechanical HelioScope section includes field segment settings, area calculations, a separate-standing category of keep-outs to minimize the accuracy faults during the installation process. Each option is presented next to the imaginary of the project. The user is able to select, drag and click new adjustments to customize the HelioScope simulation.
The electrical design is completed when the recombining box, combiner poles, and conductors together with inverters are added to the design. Then, the report is available in the HelioScope electrical section. Preview of the electrical schematics together with imagery, voltage, wiring specifications, and final reports are presented in the Report section.

Metrics and Reports
There is a list of available reports to share with the teammate when the designing simulation of the solar panel installation comes to an end. There are 3D design, electric, and mechanical schemes and reports in the Reports menu. It is possible to simulate design schemes, shading and sharing reports, imaginary based on the specified information and settings. For example, these are infographics on monthly production of the planned solar system and sources of system loss.

The Final Word: HelioScope Pros & Cons
To sum up, the solar software HelioScope after the last update is worth the attention of modern designers. The best conclusion on this review will be the final word in the form of the pros and cons of the HelioScope software:
Pros
- Bankable energy simulations
- Easy-to-use designing options
- Sharable reports
- High-level accuracy and user-friendliness
- Automated calculations
- 1-year free trial (a demo version)
Cons
- High pricing ($95 monthly)
- Sync errors with Google maps
- Discounts only for the annual subscription plan ($75 monthly)
- Low import capabilities